Building a Site with Vue, Nuxt.js, and WordPress REST API, Part 3
This is the third part of a <span>{{ series.length }}</span>-part series where we use the WordPress REST API to build a blog layout using Vue and the static renderer Nuxt.js.
- Part 1 - Getting Started
- Part 2 - Site Data and Vuex Store
- Part 3 - Displaying Posts and Adding Some Style (You are here)
Displaying Posts
In our last post, we added a nice little page header and set up a Vuex store. We still don’t have pages for individual posts, though. Let’s fix that now. At the end of our post, it should look something like this:

Pulling New Data from the WordPress Rest API
The first thing we need to do is to update our WordPress REST API library to let us pull individual posts. We’re going to set up our URLs to be based on the post’s slug. The WordPress REST API’s individual post method requires a post ID, which we may not have (e.g., if we’re coming in from a permalink to a post), so we’ll just continue to use the posts endpoint and pass in the slug.
lib\wp.js
class WpApi {
  // ...
  posts (options) {
    const params = {
      page: 1,
      per_page: 5,
      ...options
    }
    return axios.get(`${this.apiBase}/wp/v2/posts`, { params })
      .then(json => {
        return { posts: json.data }
      })
      .catch(e => ({ error: e }))
  }
}
We make a slight change here. We can now pass in an options object to the post() method and it will merge the options with our default options.
You’ll also notice that we have an author line on our single post page. However, the post objects returned by the WordPress REST API only return the ID for the author. Let’s add a method to pull the list of authors from the API.
lib\wp.js
class WpApi {
  // ...
  authors (options) {
    const params = {
      page: 1,
      per_page: 20,
      ...options
    }
    return axios.get(`${this.apiBase}/wp/v2/users`, { params })
      .then(json => {
        return { users: json.data }
      })
      .catch(e => ({ error: e }))
  }
}
Updating the Vuex Store
Individual post data is application state, so we should store that data in the Vuex store. Unlike the post list, the current post is just a single object. Authors will come in from the WordPress REST API as an array of objects, but we’re going to convert them to an object that references each author by ID to make it easier to look up author details for our post view.
Here’s the updated code:
store\index.js
export const types = {
  // ...
  AUTHORS_UPDATE: 'AUTHORS_UPDATE',
  CURRENT_POST_UPDATE: 'CURRENT_POST_UPDATE'
}

const createStore = () => {
  return new Vuex.Store({
    state: {
      // ...
      authors: {},
      current_post: {}
    },
    mutations: {
      // ...
      [types.AUTHORS_UPDATE] (state, payload) {
        state.authors = { ...payload }
      },
      [types.CURRENT_POST_UPDATE] (state, payload) {
        state.current_post = { ...payload }
      }
    },
    // ...
  })
}
We simply add new type constants, base states, and mutations for authors and current post.
Next, we need to update our nuxtServerInit() method. We don’t want to get the current post, because we won’t know what to query until we have routing details, but we do want to get our authors immediately when we load the site:
store\index.js
const createStore = () => {
  return new Vuex.Store({
    // ...
    actions: {
      nuxtServerInit ({ commit }) {
        const getSiteData = wp.siteData()
          .then(res => {
            commit(types.SITE_DATA_UPDATE, res.site_data)
          })
        const getAuthors = wp.authors()
          .then(res => {
            const authors = res.users.reduce((out, val) => {
              return {
                ...out,
                [val.id]: val
              }
            }, {})
            commit(types.AUTHORS_UPDATE, authors)
          })
        return Promise.all([getSiteData, getAuthors])
      }
    }
  })
}
Since we’re getting site data and authors, we’ll create a promise for each and then return Promise.all to ensure that we don’t start rendering until we have both site data and authors.
In our getAuthors promise, we use a reduce to convert our array of authors objects into a single object that references each author by ID.
Creating a Post Component
Previously, we created a PostExcerpt component that displays a preview of our post on the home page. It’s pretty simple, but it’s also pretty similar to what we’ll want for our actual post. Instead of creating a new component, we can just tweak the one we have. We’ll rename it from PostExcerpt to PostContents and add a prop so that we can specify whether we’re in excerpt or full post mode.
/components/posts/PostContents.vue
<template>
  <article class="card">
    <h2 class="post-subtitle">
      <nuxt-link :to="`/posts/${post.slug}`" v-if="mode === 'excerpt'">{{ post.title.rendered }}</nuxt-link>
      <span v-else>{{ post.title.rendered }}</span>
    </h2>
    <div v-if="mode === 'full'" class="post-meta">
      <p>{{ post.date_gmt }}</p>
      <p>by {{ authors[post.author].name }}</p>
    </div>
    <div class="post-body" v-html="post.excerpt.rendered" v-if="mode === 'excerpt'"></div>
    <div class="post-body" v-html="post.content.rendered" v-else></div>
  </article>
</template>

<script>
import { mapState } from 'vuex'

export default {
  props: {
    post: { type: Object },
    mode: {
      type: String,
      validator: val => (['excerpt', 'full'].includes(val))
    }
  },
  computed: mapState(['authors'])
}
</script>
We define a prop called mode that takes a string value of either excerpt or full. Then we use the v-if and v-else directives to determine if we should:
- Link the post title to the post page
- Display post meta data, and
- Show an excerpt or the full contents of the post
We’ll also need to remember to update our index page to use the new component name and prop.
/components/posts/PostList.vue
<template>
  <ul class="post-list">
    <li v-for="post in posts" :key="post.id">
      <PostContents :post="post" mode="excerpt" />
    </li>
  </ul>
</template>

<script>
import PostContents from '~/components/posts/PostContents'

export default {
  // ...
  components: {
    PostContents
  }
}
</script>
Formatting the Date
This will be great, except the format for the date comes in from the WordPress REST API as an ugly ISO date string. It would be much nicer to display the date in a more human-readable format.
To do that, we’ll create a Vue custom filter.
You can add custom filters globally in Vue simply by calling Vue.filter() before your first application render. To do this is Nuxt, we need to use the plugin mechanism.
To make it quick and easy to manipulate our date data, we’re going to use the date-fns library. date-fns has most of the same great features of Moment.js but it’s library uses pure functions, operates on native Date objects, and allows us to import only the features that we need. First, we need to install date-fns.
npm install date-fns --saveNext, we’ll create our filter. Filters in Vue are applied like this:
<template>
  ...
  <p>{{ input.value | filter }}</p>
  ...
</template>
The filter is listed to the right of the pipe. The filter takes the value to the left of the pipe as an input and provides the return value of a function as the output.
We’ll create a very simple filter in the plugins folder.
/plugsin/vue-filter-date.js
import Vue from 'vue'
import parse from 'date-fns/parse'
import format from 'date-fns/format'

Vue.filter('output-date', (input) => format(parse(input), 'MMMM D, YYYY h:mm a'))
Using the Vue.filter functions, we create a filter named output-date that takes our ISO date string as an input, parses it into a Date object and then outputs the value in the format “January 1, 2018 8:15 pm”. We can now use this filter anywhere we encounter a date in the format of an ISO string.
We need to update our Nuxt config to use enable our plugin, telling Nuxt to process our plugin file and to load date-fns in our main build file.
/nuxt.config.js
module.exports = {
  // ...
  build: {
    vendor: [
      'axios',
      'date-fns'
    ],
    // ...
  },
  plugins: ['~/plugins/vue-filter-date']
}
Finally, we just apply the output-date filter in our component using the pipe character.
/components/posts/PostContents.vue
<template>
    ...
    <div v-if="mode === 'full'" class="post-meta">
      <p>{{ post.date_gmt | output-date }}</p>
      <p>by {{ authors[post.author].name }}</p>
    </div>
    ...
</template>
Setting Up Routing
The next thing we need to do is set up our routing. As a refresher, routing in Nuxt is created by the directory structure in the pages folder. Nuxt documentation has a full overview of how routing works; our example here will be pretty simple.
We’re going to set up our post URLs in the format /posts/{{ slug-name }}.
To do that, we’ll need a dynamic URL. We’ll create a new file: /pages/posts/_slug/index.vue
The underscore at the beginning of the _slug directory makes that a dynamic route. Because of the name, we’ll have access to the slug value as part of the params passed into our index.vue through the context object on the fetch() method. The context object provides information about the Nuxt application to individual components.
/pages/posts/_slug/index.vue
<template>
  <main class="single-post-container main-contents">
    <PostContents :post="current_post" mode="full" />
  </main>
</template>

<script>
import { mapState } from 'vuex'
import PostContents from '~/components/posts/PostContents'
import wp from '~/lib/wp'
import { types } from '~/store'

export default {
  fetch ({ store, params }) {
    const existing = store.state.post_list.filter(p => p.slug === params.slug)
    if (existing.length > 0) {
      store.commit(types.CURRENT_POST_UPDATE, existing[0])
      return
    }
    return wp.posts({ slug: params.slug })
      .then(json => {
        store.commit(types.CURRENT_POST_UPDATE, json.posts[0])
      })
  },
  computed: mapState(['site_data', 'current_post']),
  components: {
    PostContents
  },
  head () {
    return {
      title: `${this.site_data.name} | ${this.current_post.title.rendered}`
    }
  }
}
</script>
Our template is very simple. We just wrap our PostContents component from above and pass it the current post. Now we have to get the current post.
Again, our fetch() method is used to asyncronoushly update the Vuex store before we render the page. We’re going to be smart about making calls to the WordPress REST API here. We’ll check to see if the post with the requested slug already exists on our post list from the index page. The slug is available on the params value from the context object. If it does exist, (e.g., we came here from a link on the home page), we just commit that value as the current post in our store. Since Vuex mutations are synchronous, we can just return immediately after that.
If, on the other hand, we do not have the post object in our post list, we need to fetch it from the API. In that case, we fetch the post from the API and then commit the post as the current post in our Vuex store. Since this process is asynchronous, we need to return a promise to ensure that Nuxt doesn’t render the page until the process is complete.
Now we use mapState() to pull the current_post and site_date from our Vuex store. And we’ll update our title in the head() with the post title.
We now have a working post page. Awesome!
Adding Some Style
At this point, our blog is somewhat functional, but still pretty boring and ugly. Let have a little fun and make it look a little better before we do some more feature work. The point of this post isn’t to teach you CSS, so we won’t cover all of our styling work here, but we will look at a few points.
We already linked up our very basic stylesheet in the first post, so we’ll add some additional styling in our Sass files. You can view all of our updated Sass files here.
We’re going to add a nice webfont from Google Web Fonts to our page. We’ll need to add a link to our page head. Because we want to add it to all of our pages, we need to update our Nuxt config file to add the link to stylesheet to our head.
/nuxt.config.js
module.exports = {
  // ...
  head: {
    // ...
    link: [
      // ...
      { rel: 'stylesheet', type: 'text/css', href: 'https://fonts.googleapis.com/css?family=Source+Sans+Pro:300,400,400i,600,600i,900' }
    ]
  },
  // ...
}
Now, Source Sans Pro will be available for all pages in our site, which is good since we set it as our base font.
Let’s add our super sweet gradient to the header of our page next. Our header is in the BlogHeader component. So we’ll add the header styles to the scoped styles of that template.
/components/layout/BlogHeader.vue
<template>
  <header>
    <div class="header-contents">
      <h1><nuxt-link to="/">{{ siteData.name }}</nuxt-link></h1>
      <p class="subhead">{{ siteData.description }}</p>
    </div>
  </header>
</template>

...

<style lang="scss" scoped>
header {
  padding: 4rem 0 7rem 0;
  background-image: linear-gradient(325deg, #000380 2%, #197849 100%);
  box-shadow: inset 0 1px 3px 0 rgba(0,0,0,0.50);
}

//...
</style>
We also add styles for the text in our header section, which you can check out in GitHub. We use the lang attribute to tell Vue to compile our styles using Scss. When you apply scoped styles, Vue processes the styles so that they won’t be used outside that component.
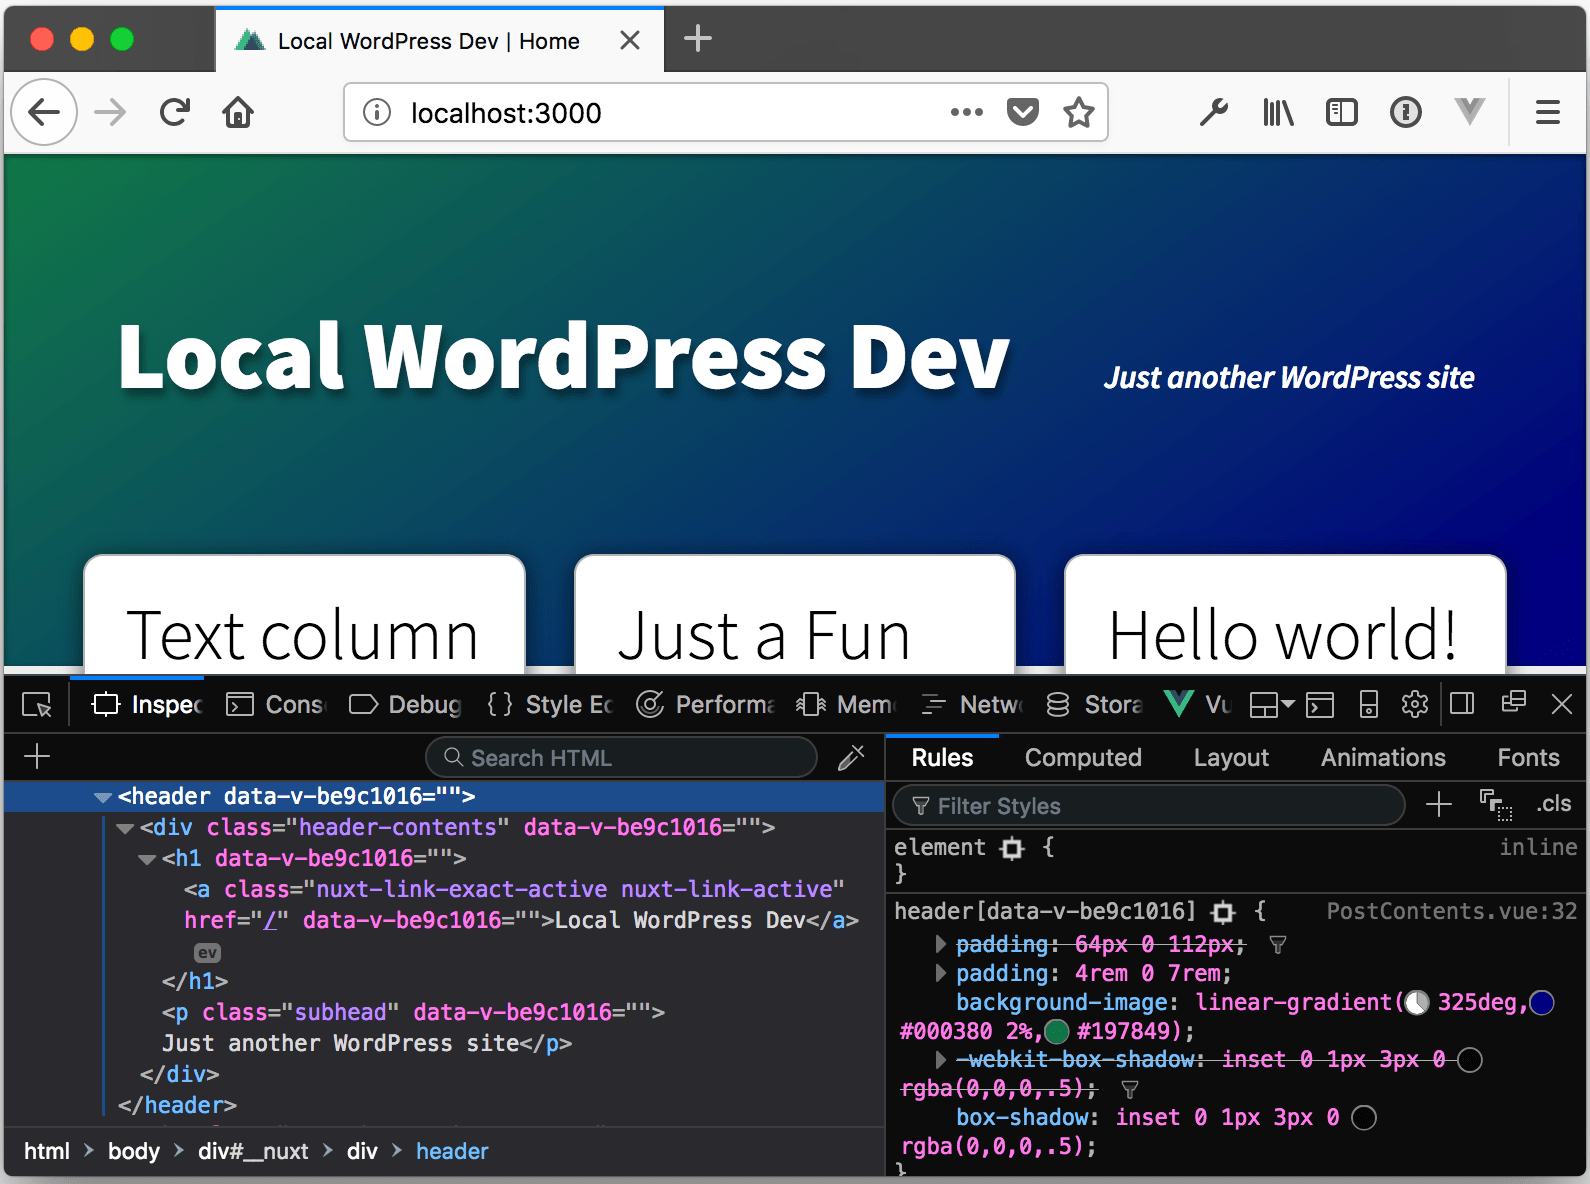
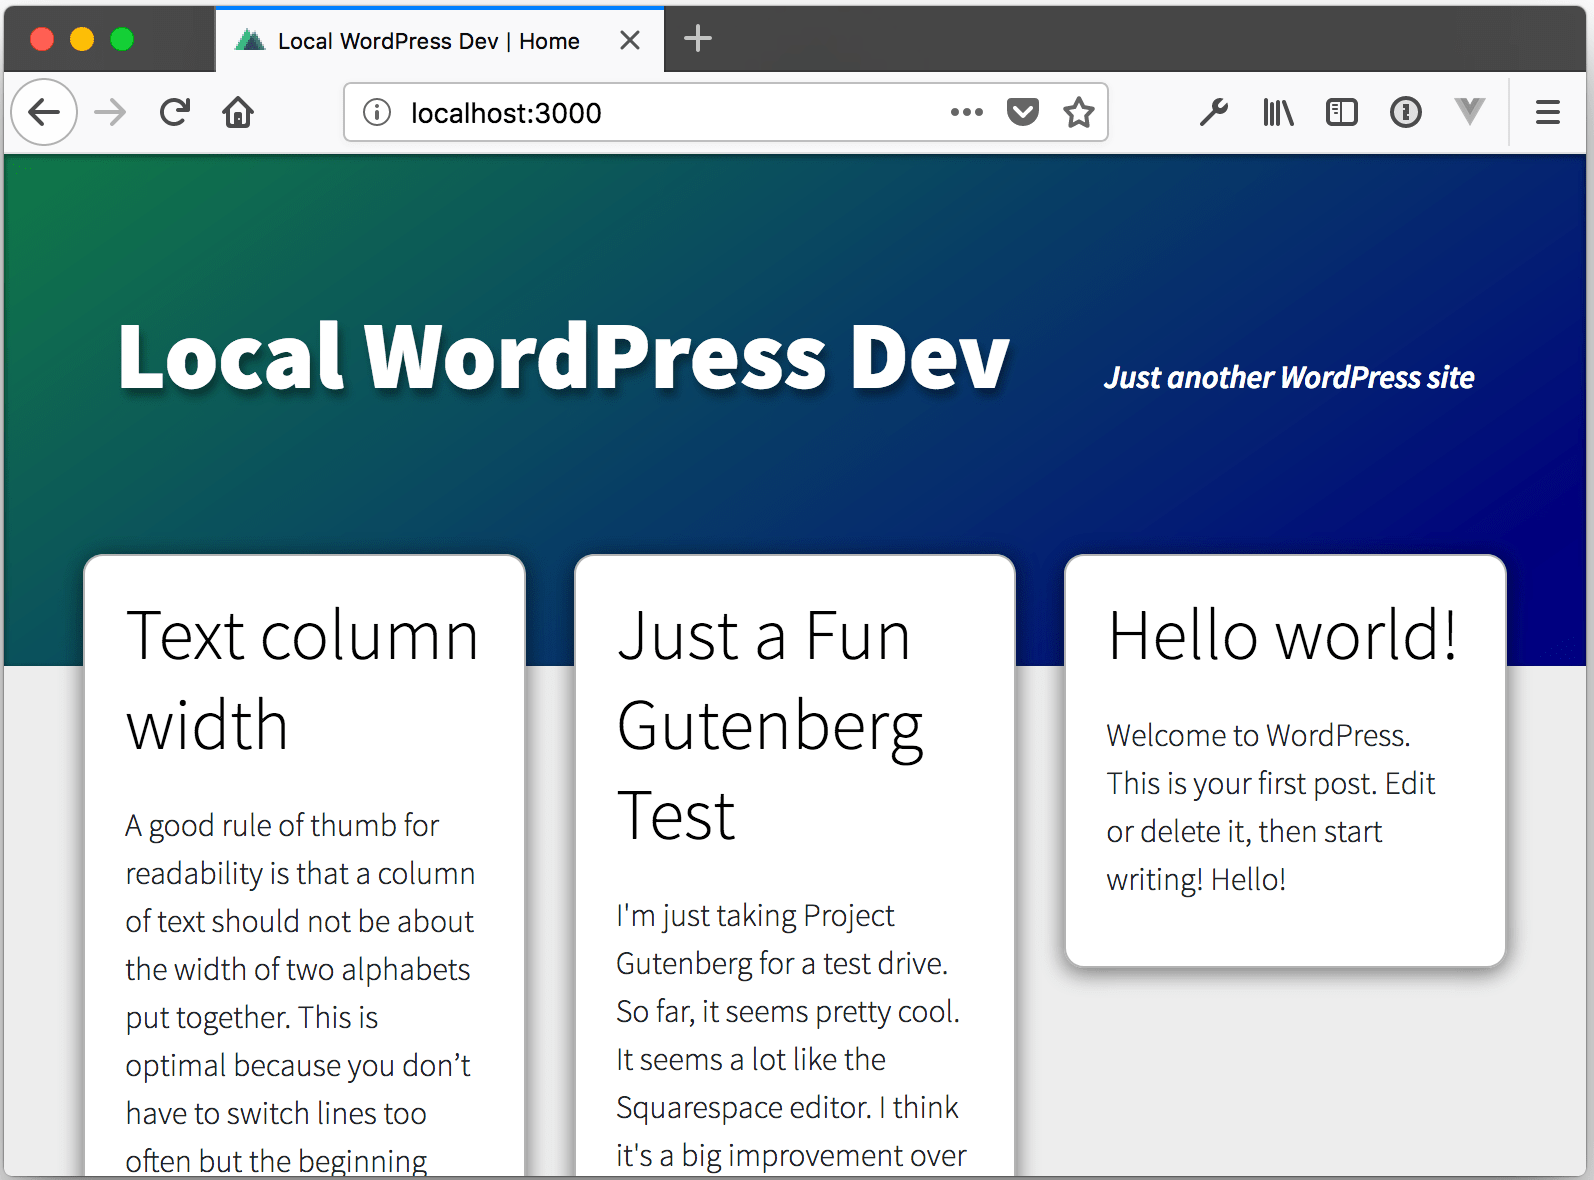
As you see on the rendered page, Vue added an attribute to the header element and scoped our sweet background style to header elements with that attribute. Coolio.
Finally, let’s take a quick peek at our styles for the layout of the main post page. We’re going to use grid layout to get a nice 3x3 grid of posts on our homepage. We’ll do this by adding scoped styles to our PostList component.
/components/posts/PostList.vue
<template>
  <ul class="post-list">
    <li v-for="post in posts" :key="post.id">
      <PostContents :post="post" mode="excerpt" />
    </li>
  </ul>
</template>

...

<style lang="scss" scoped>
.post-list {
  padding: 0;
  display: grid;
  grid-gap: 1.5rem;
  grid-template-columns: repeat(3, 1fr);

  li {
    list-style: none;
  }
}
</style>
As you can see, grid layout makes it really easy to create this layout. (Of course, in production, you’d want a fallback here.) We just set display: grid; then set out columns to repeat three columns on each row with grid-template-columns: repeat(3, 1fr);.
Here’s what our post list looks like now:
(For a deep dive into grid layout, I highly recommend Rachel Andrews’s Grid by Example.)
Wrapping Up
There’s a lot more we can do, but at this point we now have a functioning blog with a list page and individual post pages that isn’t completely ugly.
You can also check out the entire repo on GitHub at this point in project.
Tune in next time when we’ll talk about using the Nuxt as a static site generator with our site.